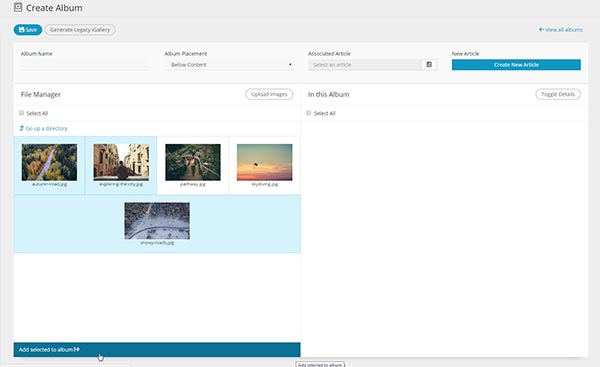
The iGallery module is provided to SIMS licensees who have purchased this optional feature. The iGallery module allows you to create an image gallery of thumbnails that are clickable and will overlay a larger image. It is a great tool for displaying company event photo galleries, or if you are a photographer, displaying your latest works of art.
The following instructions will help guide you through the steps of creating, posting, and deleting an iGallery Album in SIMS Content Management System.
Creating an iGallery Album
- Log into SIMS
- Under the Admin Menu, expand the Modules section and select iGallery.
- Click the Create Album button.
- Enter the name of your album in the Album Name field.
- Select the Upload Images button. Browse and upload your desired file(s).
TIP! You may choose to add your photos to a folder to make locating your desired image(s) easier.
Note:

Adding Images to your Album
In the File Manager Panel of the iGallery Module, select your images and click the Add selected to album button to move them into the In This Album Panel (this is your gallery).
Adding Details (Title, Alt, Description)
Once you have added the images to your album, you can fill out the following image details by selecting the edit icon next to each image:
- Title – The title of your image.
- Alt – The alternate text for your image (in case the image doesn’t load).
- Description – A short description of your image.
Note:
Removing An Image From An Album
If you would like to remove an image, select the image and then click the Remove Selected option.
Adding An iGallery Album to an Article
There are two ways you can post an iGallery Album on your article:
Method 1: iGallery Associated Article
- Set the Album Placement (select from dropdown menu) and Associated Article (click the page icon).
- When you set an Associated Article, the album will be placed in that article. You can set the Album Placement to display it Above or Below your content.
- Make sure to Save.
Method 2: Legacy iGallery Templates
- In the iGallery module, select your album.
- Click the Generate Legacy iGallery button. You will receive a confirmation that the iGallery Template generated successfully.
- Under the Admin Menu, expand Article Management and locate the article in which you would like to add an album to.
- Enter the article and click to where you would like to place the album within the editor window.
- Select the Insert Template icon or from the Insert Tab, select Insert Template.
- Locate the iGallery template you generated, it will be named iGallery-YYYYMMDDHHHH (Year, Month, Day, Time of when the gallery was created)
- Select Insert.
- Be sure to SAVE your article when complete.
Important!
Deleting an iGallery
To delete an album, in the iGallery module, click the check box next to the Album Name. Click the Delete Selected button at bottom.